Sunday, May 31, 2015

Photographing Brown Pelicans in Flight: Part 1


Since 2009, I have had the great joy of photographing nesting brown pelicans in the Everglades. Each spring, I paddle out to the rookery as many times as possible and spend several hours at a time sitting in my canoe while attempting to capture scenes that include pelicans flying to and from the nest. So how does one capture large brown pelicans in flight from a canoe? If bird photography is your interest, you may find some good tips here on shooting birds in flight.

Consider these three things when attempting to improve your flight shots; knowledge of birds, camera technique, and post-processing of images. For this blog, I will begin with the first point which is,  know your bird. Watch it and study it. To get the best flight shot possible, it is essential that you do this. You can say that about any photography subject, but with birds in flight, understanding bird behavior and the dynamics of flight are most important. In this regard, keep these three points in mind.
  • Birds will mostly land and take off into the wind.
  • When landing, birds will go from a horizontal to a vertical position and use their wings as a parachute to slow down. When landing, a bird will appear to hover as it stretches its legs and feet forward and fans out its tail feathers that point downward (as seen in the photo above, for example).
  • Nesting birds will demonstrate a fairly consistent flight pattern and schedule.

I plan my mornings at the rookery when there is an expected easterly breeze. This means both the sun and wind are to my back and the birds will be landing and taking off toward me. This is important because to me, the best flight shots are when the bird is facing the camera and wings are open, and the sunlight captures the underside of the wings. During landing, I can capture a bird with full wing spread, including tail feathers, out-stretched feet and eyes facing the camera. During early morning hours, the sun will light up those beautiful wings and provide a nice catch light in the eyes, a glorious thing to see.


A few hundred feet away from the birds, I get my camera out and ready for use. I always have a lens cloth in my pocket if needed. I close the pelican case and then begin slowly paddling closer to the birds. As I paddle, I am watching the rookery, looking for nests and adults flying to and from. After a few minutes or so, I can determine where I will focus my attention, typically a busy nest. I then proceed to a location where I have good light on the subject and where I can anchor or stake out the boat easily without making undue noise or commotion. Typically, I station my boat about 70-100 feet away from the subject. Once in place, I rarely move to another location and will stay there for several hours.

To get the best flight shots, consider the distance between you and your subject. The first and most obvious point is that you do not want to get too close to the birds to disturb them. Through trial and error, you learn that birds have a species-specific comfort zone and if you cross that line, they will react. So get use to keeping a large distance between you and the birds (there are exceptions such as boardwalks where nesting birds are sometimes within 20 feet of a camera).


My second point here is that the ability to fill your frame with a pelican in full wing spread will depend on three things, the distance between you and the bird, your maximum focal length and your camera's sensor size (cropped or full frame). A cropped sensor digital camera will essentially make the bird appear closer in the frame compared to a full frame sensor camera. My camera, the Sony a77 has a 1.5x cropped sensor that can make a 400mm focal length look like 600mm. The good thing about brown pelicans is they have a wing span of 6-8 feet. This means that with my camera, I can fill the frame with an 8-ft wing span from a distance slightly greater than 100 feet. At the rookery, I am sometimes within 40-50 feet of a flying bird and use focal lengths of 250mm or less to capture it's wing spread (this is why a zoom lens is preferred over a fixed prime lens). In fact, clipping the wings is a common occurrence for me as I fail to zoom in enough to capture the entire wing span. The bottom line is, you need a significant focal length lens (400mm or higher depending on the camera's sensor size) in order to keep your distance from the birds. The good side of brown pelicans is they are large and can fill your frame from a great distance.


As you watch the birds, you will notice flight patterns. This is particularly the case for the male pelican that flies into the nest with a branch in its beak every 10-15 minutes. At the rookery I photograph, there may be a half dozen nests within my range of sight. After some observation, I can distinguish a bird from another simply by its flight path. As a result, I concentrate on the nest (sometimes two nests) that are in best light and have clear surroundings so I may capture the incoming bird without distracting mangroves or other birds. As the male pelican arrives with a branch, the female reacts by raising her head and opening her beak so that the male can pass off the branch to her. The male will stay in the nest for about 5-10 minutes before it flies off again on its quest for a branch. Within a couple hours, I can capture several hundred frames of birds flying into their nest.


With that much opportunity to photograph a pelican in flight, over time I have greatly narrowed my acceptance rate. Pelicans in flight or in landing present few variations of poses and after awhile images can look repetitive. I first narrow down my images using the following criteria. To keep an image, all criteria must be met:

adequate sharpness, especially on the face
at least one eye in the light
near perfect to perfect exposure
no object (like a mangrove branch) covering the bird
sunlight on the underside of the wings
bird is flying into the camera

In the field, I shoot with all above points in mind. Afterwards, I look for something special about each image to set it apart from the rest. It may be the exquisite lighting or it may be an interesting branch in the bird's beak. Clouds in the sky can add to the composition and an interaction with another bird can be fun as well.


The best way to go about photographing birds in flight is practice, practice, practice. Even if you take 100 photos and find only one that is worth keeping, your experience is more valuable than the images produced. Next blog, I will talk about camera technique including exposure and will touch a bit on post-processing strategies to enhance your image of the beautiful brown pelican in flight.

Tuesday, May 19, 2015

Adding Ripples to the Water


Naturally, photography from a canoe means that most of my images will contain water in them. And because the shoreline of south Florida from the Gulf to Atlantic is primarily lined with mangroves, these are also a big part of my photography. It is a constant challenge to photograph mangroves and water in a fresh way. But, I keep trying. The other morning, I set up to capture some sunrise scenes on Biscayne Bay and located a single small mangrove to work with. I lined up with it so the tree stood between me and the impending sunrise. I examined the scene from various positions, estimating where the sun would appear relative to the tree. If I stood up, the horizon line would be above the little tree, if I crouched down, it fell behind the dense leaves. I decided to work with the latter.

This would be luxury as I would set up the tripod in the water while I sat in the boat with my legs over the side and feet on the ground (shallow waters here). I decided to experiment with water movement. By gently rocking the canoe, I created water ripples that would appear at the bottom of the composition and continue traveling toward the mangrove. Without filters, I set the exposure with a shutter speed of 1/4 sec, aperture at f11 and ISO400. I wanted a slow enough shutter speed to give the water a smooth appearance, but not too slow as to dampen the ripples.


I rocked the canoe gently and evenly in order to create ripples that were evenly spaced. Fast and short motions created thin ripples with little distance between them, such as the image above. For the most part, I liked the effect, but there is some unevenness and the ripples continue on toward the horizon. So I continued playing. You can see in the next image the ripples are wider and all but disappeared toward the middle of the composition. The shutter speed was 1/2 sec this time, which smoothed out the ripples. I liked it.


By now, the sun was beginning to appear and it was getting lighter. I put the filters on, a total of 5 stops. Below is a typical image, using a shutter speed of 3.2 sec. I decreased the aperture size to an extreme end, f22. With a narrow opening, light entering through the lens becomes diffracted or bent. This in turn creates points of light. This would make it possible to capture a sunburst as it appeared behind the leaves. The effect of the slow shutter speed was quite nice on the water, but I was not able to get that burst effect on the sun as I wanted.


I went back to making ripples. This time, I kept the aperture at f22 and increased the shutter speed to 0.4 sec (increased the ISO to compensate). I repositioned the camera so the sun would have more space around it. The result is seen below. I was pleased with the ripples, gentle yet dynamic and quietly disappearing into the middle of the composition. And the sun rays are noticeable around the mangrove. I love it! Could this image be improved? Of course! I don't like the dark line of water just below the horizon line and maybe the stringy marine debris hanging from the mangrove is unattractive. But, I do like the horizontal ripples against the vertical mangrove roots.


I really enjoy these little experimental sessions. This prompts me to go back out there and refine the "ripple technique" and search for creative ways to use it. That's what it's all about, creating through a camera lens.

Tuesday, May 5, 2015

I know an anole


"Artists see the world through different eyes to most people; they see the beauty in things that may be considered boring or mundane". Nicholas Huggins

In Miami, a wildlife photographer has endless opportunity to photograph animals. Many of these animals are very common and easily seen as mundane. If you have lived in the area for any amount of time, without any research at all, you might conclude that one of the most common (mundane) animals is the anole lizard. Consequently, it is easy to overlook as an exciting photo subject.

Recently, I spent several hours on an overcast day at Fairchild Tropical Botanic Garden, one of my favorite urban places to photograph. While plants are the main draw to the gardens, I inevitably spend most of my time hunting for lizards and spiders, and occasionally birds. Usually it is the orange-headed adult male agama lizard or the green iguana that I am after. I tend to ignore the "mundane" smaller brown or green anole because every time I notice one, it is in the same position. Currently, Chihuly glass art is installed throughout the park. These colorful pieces provide another surface for the expert climbing anole to cling to. With that, I thought I might be able to turn the mundane into something more exciting.

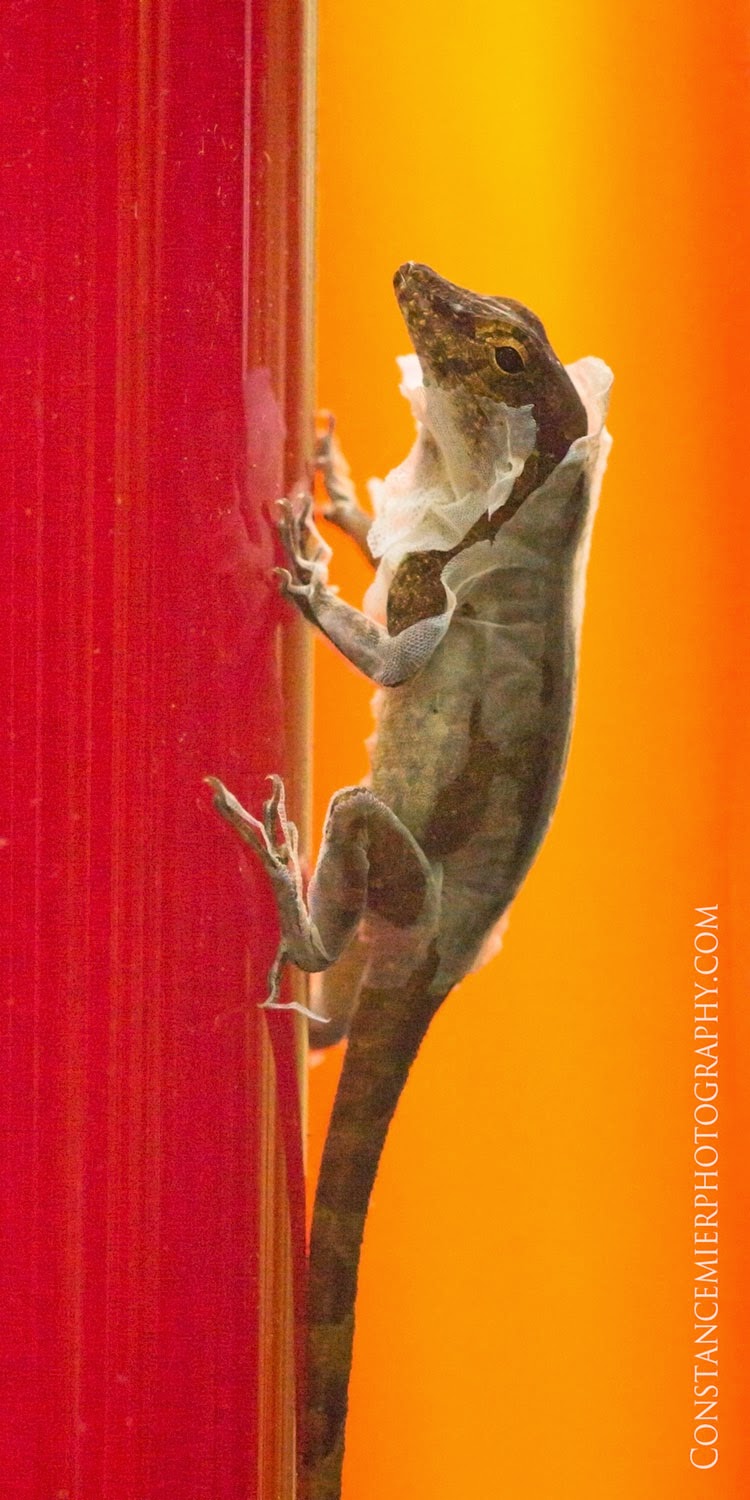
The anoles were everywhere that day and they love the glass. An interesting observation was that the Chihuly pieces installed among the cacti appeared to be designed like cacti. But as I observed the anoles, I began to think that maybe Chihuly had lizards in mind when he created these pieces. As an example, take a look at this image of the brown anole and its dewlap.


Anole is a type (genus) of lizard and is the most common and abundant in Miami. Among the anole species, the green anole is the only one that is native here. The others primarily come from the Caribbean. It seems that the non-native brown anole has taken over and in fact, is one cause of a reduced number of green anole. Apparently, the brown eats the green anole eggs.

An interesting fact about the anole is that it molts in pieces and will eat its shedding skin as a source of calcium. Here is an image of a molting brown anole, similar to the first image above.


Anoles have toepads that are large scales on the underside of fingers and toes. They contain hairlike structures called setae that allow the lizard to cling to smooth surfaces, like glass. Take a look at the next two images to see those toepads in action.


And here are two more images, both of a crested anole that has just captured a dragonfly while hunting on a Chihuly glass.


As nature or wildlife photographers, we are challenged to be creative in order to set our images apart from the rest. One way to do that is to go after the mundane animal (you know, the one that will always be available to you) and capture it in an extraordinary way. At the very least, spend some time getting to know your little neighbors. They may be more exciting than they appear.


Thursday, April 23, 2015

Let the Ball Drop


"Buying a Nikon doesn't make you a photographer. It makes you a Nikon owner." Author Unknown


As photographers, we are always looking to improve and capture a better image. To do this, you need clear goals and objectives, and you need to go out there and collect data. And learn to juggle. Say what?

First, goals and objectives are the foundation of what I do as a scientist and teacher. Data collection, interpretation and dissemination are all part of the process. This sounds mundanely academic (and it is) but fortunately, these useful skills have spilled over into my photography. While the term "data collection" appears as far removed from art as a statistics textbook, it is an essential part of the artistic process and does not require formal training. Artists, like scientists collect data in the process of learning their craft. Having clear direction or goals serves to help the artist achieve his or her artistic vision.


We can have a goal in mind; for instance, become a better landscape photographer. But to achieve the goal, we need data. Data collection is information gathering and experimentation, and then successfully making order out of the chaotic pieces of information and experience. This is, for all intents and purposes, the act of learning. From chaos comes order or a higher level of understanding and new skills (our goal). And then we apply all these to our art and create a better landscape image. But, the most important aspect to all of this is that we stay committed and continually set new goals. What this means is that we have to frequently put ourselves in the uncomfortable position of failure and make mistakes. 

"We adore chaos because we love to produce order". M. C. Escher


So what does all this have to do with juggling? Twenty years ago, I read a book titled "Lessons From the Art of Juggling" by Michael J, Gelb and Tony Buzan. Not only did I learn to juggle, but I learned to teach myself how to juggle. Perhaps the most poignant tip from the book was simply, "let the ball drop". Rather than lunging toward it, let it fall to the ground was the first lesson. In short time, I learned to throw the ball with one hand so that it landed perfectly into the motionless waiting hand. Can you see how this becomes a metaphor to photography?

"You don't learn to walk by following rules. You learn by doing, and by falling over." Richard Branson

When I began photographing the wilderness in earnest over a decade ago, I knew practically nothing about photography. I would go out there with the camera not knowing what I was doing and just shoot, shoot, shoot. Taking pictures was like juggling. Many times, I lunged at the poorly thrown ball. This may be a metaphor for taking a bad image and trying to "photoshop" it into something better. I realized quickly that I had to improve my use of the camera. In other words, I had to improve how I threw the ball.  

"If we knew what it was we were doing, it would not be called research, would it?" Albert Einstein


So I plunged into research and experimentation and approached photography like a scientist. I put myself out there for criticism. I began communicating with experts and taking workshops. And as often as I could, I photographed for the sake of photographing. Sometimes, I got very frustrated and had feelings of inadequacy that came and went frequently. One day, I would proudly display an image that looked exciting and bold, and the next day it appeared dull and flat. And there was always another photographer that made it look so easy, who seemingly never failed.


"I am always doing that which I cannot do, in order that I may learn how to do it". Pablo Picasso

I go further into this year with two clear goals and have developed specific objectives to help me achieve them. Neither goal is directly related to winning contests, getting into an art festival, or selling more prints. Instead, my goals are to improve my craft and my art. Have you considered your photography goals? I challenge you to leap out of your comfort zone and learn a new camera skill, experiment with a new genre, study up on digital camera sensor technology, post an image on a critique forum, ask questions, just try something new and challenging. And don't be afraid to let the ball drop.

"I'm still learning". Michelangelo


Tuesday, April 14, 2015

What type of photographer are you?


“Landscape photography is the supreme test of the photographer - and often the supreme disappointment. ” Ansel Adams

Birds get much of my attention and have for a long time. Long past are those 10,000 first photographs. With that, I think I can accurately refer to myself as a "bird photographer". I am very comfortable with bird photography. Nevertheless, there is always room for improvement. Always. This can be a single minded effort, and I applaud those geniuses that can focus on one thing and remain on point throughout a lifetime. There are bird photographers that truly fit that description.


Lately, my attention has moved away from birds somewhat and more toward landscape (land and water) photography. Naturally, water-scape images are a significant part of the Everglades. In the beginning for me, these images were nothing more than snapshots from the canoe taken with the sole purpose of a visual journal of our trips in the glades. But now it is much different than that.


Landscape photography has become weighted down as I pay closer attention to detail and attempt to acquire skills used by landscape photographers. This also means I carry more equipment, literally weighing me down. I spend more time now seeking out a landscape composition, typically while standing in the shallow flats of Biscayne Bay or on a beach somewhere in the Everglades. I've gotten bold and placed the tripod in the water as I sit in the canoe inside a mangrove tunnel or stand up in the canoe to get level with the camera while on an old airboat trail that runs through a grass prairie.


In the meantime, landscape photography is causing me much consternation. I make lots of mistakes and I fumble around a lot. With bird photography, the only clumsiness I really experience is on those rare occasions when I attach an external flash and better beamer and try to convince myself that I can take a better image by adding this additional weight and volume to my camera.  I guess I still have to master the camera's tracking focus feature, and no matter how many frames per second I can rifle off, the great white egret is always faster than me. So there is always something that needs to be improved upon. But all-in-all, I can approach bird photography with some confidence and certain amount of finesse that comes with hundreds of hours and thousands of images (most of which have been deleted).


In walks landscape photography. Extremely seductive, especially given all the amazing images from the masters that inspire, landscape photography has hooked me. I am trying to figure it out, and I am attempting this in an environment that does not easily lend itself to powerful images. And I feel like a total klutz. Maybe its because of the tripod I have to carry around or the filters I have to attach to the lens. Photography is, after all, a physical thing as well as a mental thing; and to this end, it could be compared to a sport. Training is the ultimate ergogenic aid. With landscape photography, its all about timing and getting to the right place at the right time and then adapting quickly to the constantly changing light and color. Dodge and weave, dodge and weave.


So I will continue to fumble until I get it right; walking the long beach before realizing I forgot my remote control, clumsily attaching the filter holder as the colors of the sun began to fade, forgetting to turn off the steady shot, failing to get a straight horizon, taking way too long to focus and set up a shot and missing the right moment as a result, overexposing, underexposing, etc, etc. And then when success happens, only to find the image is lacking something. I have a ways to go before I reach that 10,000th image, and then some.


Here's to the photographers that can truly call themselves landscape photographers and I don't just refer to those silhouettes of mountain climbing, tripod-toting dudes. I include all those that are in love with a wilderness place and only want to capture it as best as possible and will do anything to make that happen.

"I tend to think of the act of photographing, generally speaking, as an adventure. My favorite thing is to go where I've never been." Diane Arbus 


Tuesday, April 7, 2015

Peeps


If I had a nickel for every shorebird I've seen in the Everglades, I would retire and live on the edge of the Everglades. If I had a nickel for every shorebird I've seen in the Everglades that I had a difficult time identifying, I would retire and well, live on the edge of the Everglades. And I would spend more time researching these small to moderate sized birds.

This past weekend, I had the privilege of spending a couple days on one of the beautiful Ten Thousand Islands, Pavilion Key. Given the time of year, I didn't expect much in the way of bird photographs. I figured there would be shorebirds, as usual. But nothing to write home about. There are probably two reasons shorebirds have not been my target; they tend to be drab in color (gray, white and black about sums it up), and secondly and because they are drab in color, they are difficult for me to identify. When I do photograph a shorebird, I often do not know what species I am photographing. I estimate that I spend twice as much time researching shorebirds as I do photographing them. Sometimes, after looking at several images online, I am still confused.


After having spent two days photographing anything that was not a bird, I turned my attention to the shoreline near our campsite. In the warm afternoon light, dozens of gray, white and black small shorebirds were busy feeding along the water's edge. Nervous little things, they moved quickly and rarely stopped. What did I have to lose to get out the telephoto lens, lay prone on the sand and edge my way toward the birds. Within twelve feet of the action, I proceeded to observe them.


After about an hour, the birds flew off and spread out to areas farther away. Happy with my time spent, I couldn't wait to get home and confirm what species I just photographed. Because there was only one type of bird in all my images, it took only a few hits on the ibird app to identify it as the Sanderling. And with a bit more research, to determine they were all juveniles. Bingo!

When photographing feeding birds, it is always a good idea to observe them first, then shoot. Inevitably, you will find a pattern in their movements which then allows you to anticipate a shot. What these birds do is they chase the waves.  As soon as a wave recedes, the little bird is there poking at the sand that has been softened by the water. As soon as another wave comes back, the bird skitters away and finds another receding wave. And they are very fast, so a very fast shutter speed is required.


This past weekend was my last camping weekend until November. All the gear gets extra clean and dry and packed away. For a few days, my house looks like a hurricane hit it with everything that must be washed and left out to dry. My pelican cases and camera equipment get a thorough cleaning. For a couple days, it is a flurry of activity. But amidst all the activity, I found a calm relief in sitting down to research my little bird, the sanderling. After reading about it, I have a new respect for it. I lovingly looked over my images and picked out my favorites. I began to think about the next time I may have the opportunity to photograph this one-of-many shorebirds and how I might present it more skillfully and with more care.


Until then, I have here some images to share of the juvenile sanderling. And here are some interesting facts about the bird that will surely add interest.
  • The sanderling belongs to the Sandpiper family. So if you accidentally call it a sandpiper, that's OK, you are still correct.
  • The sanderling nests as far north as the artic tundra.
  • Since the 1970s, the sanderling population is estimated to have dropped 80% in the Americas.
  • The juveniles, or non-breeding sanderlings such as the ones I photographed, do not make the long migration north; instead they stay in their wintering grounds.
  • Because of their obsessive wave-chasing feeding style, sanderlings can be distinguished from other shorebirds such as sandpipers and willets.


Monday, March 30, 2015

Ironhead


Somewhere deep in the Everglades is a small bay that some folks refer to as "Ironhead Bay". As with many nicknames of specific locations in the Everglades, many may not know from where such a name was derived. At best guess, someone noticed a strange looking bird with a large beak and a head that looked like a metal helmet and named the bay after it.


Ironhead is a nickname for one of the Everglades' cherished birds, the wood stork. Notoriously, it is the health indicator of the Everglades having been on the endangered species list for decades, but recently downgraded to threatened status. What makes them an indicator species? They rely on a specific type of ecosystem for survival. The Everglades provides their necessary habitat which is marshlands located in a subtropical region, has a wet and dry season and provides freshwater fish for food. The wood stork requires low water levels to find its prey that are trapped in small pools. If the wood stork cannot find adequate food, it does not nest.


I write about the wood stork here because they have appeared on my radar more often than ever. For the past couple of years, I have had an increase in wood stork sitings. For many years, I never saw a wood stork as I paddled around the Ten Thousand Islands area of the Everglades. Now, I see them frequently soaring across the sky. In my experience, there are three types of birds in the Everglades that soar high above; vulture (turkey and black), white pelican and wood stork. Each one is quite distinguishable from the other although the white and black feathers of the wood stork can look like a white pelican from a distance. But what allows me to identify the wood stork is its long curved beak. As I observe the flying wood stork while paddling through rivers and bays that are surrounded by dense mangrove forests, I am reminded that there are large freshwater marshes behind those mangroves. This is where the wood storks will reside most of the time and the reason I see them flying above.

I also notice wood storks as I drive the Tamiami Trail or Ingraham Highway. Wood storks do not always soar high above but can be seen 30-40 feet above the ground as they cover a short distance from one roosting spot to another. This is when it is easy to mistake them for another homely looking bird, the white ibis. Both have long curved beaks, and both have black tips on white wings. But the difference is in overall size of the bird. The wood stork stands over 3 feet and has a wingspan of about 5 feet. The white ibis is about half that size.


I have had the good opportunity to photograph the wood stork, but only a handful of times and in very distinct areas. Of course the Anhinga Trail offers wood stork photo opps, up close and personal such as this one of an adult.


A juvenile wood stork is distinguishable from an adult. The first time I saw a juvenile wood stork was during a camping trip where I spent some time in and around Gopher Creek in the Everglades. In this rich marshy area, many wood storks reside, and here are two images of a youngster.


Notice the head of the juvenile does not have that rough armored exterior and even sports hairlike feathers on its top. Their young feathers also appear darker than the adult feathers. The next image below includes both juvenile and adult birds, photographed at Shark Valley.


On Biscayne Bay, I photograph mostly egrets and herons feeding in the saltwater (when not seriously polluted by freshwater run off) shallow grass flats. But on occasion, I spot different bird species. Most of these anomalies have occurred only one time. For instance, on a December morning in 2008, I found a small group of wood storks along the mangrove shoreline. That was the last time I saw a wood stork on Biscayne Bay. Here's one image from that day.


Wood storks are not exactly the most photogenic bird out there. Maybe it is for that reason I love to photograph them. It goes without saying that the photo darling among Florida birds is the bright pink roseate spoonbill. Ironically, I view the image below of a group of wood storks and see the roseate spoonbill as a photo bomb. Yes, it adds color to the scene and yes, it does detract from the drab appearance of the wood stork. I admit, I kept it in the frame for a reason.


Look at a wood stork and tell me they are not endearing? At the very least, appreciate their presence in the Everglades and know that their survival is totally dependent on our stewardship of this fragile ecosystem. Here are a couple of interesting facts about these beautiful birds:
  • They are the only storks in North America that nest
  • They catch fish by "feel", holding their bills open until a fish is touched
  • Reflexively, the bill closes within 25 milliseconds, the fasted known among vertebrates
  • A breeding pair requires about 440 pounds of fish per breeding season
  • In the 1930s, the Everglades supported nesting populations of 5,000 to 15,000 pairs
  • In the 1960s, increased development of water-control structures reduced the number of birds and by 1995 fewer than 500 pairs of Wood Storks were nesting in the Everglades.
  • Restoration of the Everglades is expected to allow an increase in the number of wood storks